
Building the Simplest REST API Possible
Introduction
REST APIs are everywhere — without them, websites would be a lot more boring. They are what integrate the frontend and the backend of a website, and we’ll be building one ourselves today — in under five minutes.
Defining a REST API
A REST API — short for representational state transfer application program interface — is what allows different programming languages and parts of an application to communicate with each other. Natively, these languages would be unable to speak to each other, as they can’t understand each other’s code. This would be a big loss, since some programming languages perform better in different fields or are geared towards specific jobs — for example, you’d never use JavaScript for machine learning. However, Python is the go-to language for this — and that’s where REST APIs show their value.
In essence, these APIs send information up and down a server, information that can be decoded and sent to the client. The strong suite of this type of API is that it works extremely well for databases — there are four fundamental HTTP methods which can be used.
- GET — gets data from the server
- POST — creates a record in the server
- PUT/PATCH — updates a record in the server
- DELETE — deletes an existing record in the server
These can be remembered by the acronym CRUD (create, read, update, and delete).
Overview of Tools used
In order to create our REST API, we are going to need to install a few prerequisites (we’ll go into that in the next section). Before we start, though, let’s take a quick look at the tools that we are actually going to use.
First off, for the backend part of our API — the part that handles the database, incoming requests, and modifies data — we’ll be using Python, and an awesome library called Flask. Don’t worry if you aren’t too familiar with Python — the code will be short, and well-explained. Other than this library, we won’t actually need anything else on the backend side!
A popular alternative to Flask, for those interested, is Django. However, this is a step up from Flask and is often much more complicated, so we’ll stick to Flask for this post.
For the frontend part of our RESTful API, we’ll be using JavaScript to modify an HTML page that the user sees — giving visual proof of our API working. Likewise, don’t worry if you don’t know JavaScript — the code is going to be even simpler than the backend!
Requirements + Installation
Requirements
Python >= 3.4Flask == 1.1.2- A web browser
Let’s get started with the setup. If you don’t already have Python, download it here.
Onto our first actual installation — Flask. If you have a Python version greater than or equal to 3.4 (you can check with python3 -V in your terminal), then you are good to go with the next step. If not, you are going to need to install pip or upgrade your Python to a more modern version — instructions are on their website here.
Once you have Flask installed, you can type python3 -m pip install Flask anywhere in your terminal, and after a minute or two you will have the Flask library installed. Onwards!
Building the Backend
We’re going to start off by building the backend — this is what the client doesn’t see, and the part of the application that does the heavy lifting and handles HTTP requests. We’ll be building this with Python and Flask.
First of all, we are going to need to import our library. Create a new file, naming it whatever you want — just make sure to have it end with a .py extension so that it is recognized as a Python file. I’ll be naming mine app.py.
We can then get started by importing Flask below.
from flask import Flask
We then need to initialize our Flask, web application.
app = Flask(__name__)
Next up, let’s create a Flask route, which will is essentially the URL that the user has to go to in order to be able to access the content. We’ll create a route at /hello, so that the user can go to that URL in order to access the data there. We can create this route using a decorator — essentially a function that wraps around another function.
Decorators could be a whole post unto themselves, but in essence they do something, execute the function they “decorate”, and then continue to do something — essentially wrapping some instructions around another function.
With Python, we can specify a decorator using the “@” symbol. Let’s go down a few lines and set up our Flask route decorator.
@app.route("/hello", methods=["GET"])
The above code sets up an application route on the home page, and supports GET requests (so JavaScript can access the data). Let’s move onto creating the actual function that will execute when the user goes there. On the line directly below the decorator, type in the following code (or you can skip to the full code and copy all the code at once).
def hello(): # you can name this anything you want
    return {"response": "Hello from Python!"}
The function that we set up above is returning data, in the form of JSON — an acronym for JavaScript Object Notation, and a language that can be read by most other major programming languages. It sends data in the form of an object, one with a name of “response” and a value of “Hello from Python” — somewhat similar to a Python dictionary.
Lastly, we need to make the application ready to run. We can do this by adding — at the bottom of the file — an app.run() function.
if __name__ == "__main__":
    app.run(debug = True)
app.run() means that the application will run when we run the code from the command line, and we are setting debug to True so that we can see everything happening and catch any potential errors.
And that’s it for the backend and Python! We’re ready to go with the simple frontend now — after just 7 lines of code! We’ll need to modify this file a bit so that we can serve the JavaScript and HTML files, but that’ll just be a few extra lines of code. You can try running this already, by opening up your terminal, navigating to the directory holding your current Python file, and typing python3 my-file-name.py.
If you do so, you’ll have some info printed out to your console, saying that the server is running on localhost:5000. If you go to http://localhost:5000/hello, you’ll already be able to see the JSON there! It’s going to look just the way that we sent it (although it will be in JSON format). You should see something like the below:
{"response": "Hello from Python!"}
However, we are going to still add some JavaScript and HTML to have the data be fetched manually, as often these REST APIs are meant to be used by the application, not viewed directly by the user.
Setting up the Frontend
We’ll be using JavaScript to access the API and some super-simple HTML to create an index page that the user can view. Let’s get started.
First off, we are going to create a folder named templates in the same directory as our Python file, and within it, a file named index.html. This is the file that is going to be rendered by Python when a user goes to our localhost website. I won’t go through the dry details of the index.html file content — it’s just a simple file with a heading and space for JavaScript to inject code.
<!-- templates/index.html --->
<!DOCTYPE html>
<html lang="en">
<head>
    <meta charset="UTF-8">
    <meta name="viewport" content="width=device-width, initial-scale=1.0">
    <title>REST API Sandbox</title>
</head>
<body>
    <h1>Data from Python below!</h1>
    <p id="fromJS"></p>
    <script src="/static/pythonFetch.js"></script>
</body>
</html>
The name of our JavaScript file is going to be pythonFetch.js. Let’s navigate back up to our root directory, and create a new folder named static. Inside, let’s create a file named pythonFetch.js, and get started working on it.
// static/pythonFetch.js
const paragraph = document.querySelector("#fromJS")
First of all, we are accessing our html p element — the paragraph. We can do this because we gave it a unique id.
fetch("/hello")
    .then(response => response.json())
    .then(data => paragraph.textContent = data.response)
    .catch(e => console.warn(e))
Next, we are performing a fetch request. A JavaScript fetch request essentially performs an HTTP request to a URL — in our case, “/hello” — we don’t have to specify the same URL as it is performing it from the same localhost domain. Since Python sends the data in JSON format, we are first decoding it. Then, we are assigning that decoded value to the text content of the paragraph element that we defined earlier — essentially modifying the HTML.
Note that we aren’t assigning data to textContent — we are assigning data.response to textContent. That’s because if we didn’t, we’d see [object Object] instead of our string, because JavaScript would view the JSON as an object — instead, we are just assigning its value.
Lastly, in case anything goes wrong, we are outputting the error to the developer console (which you can open up with cmd-alt-j on a Mac or ctrl-shift-j on anything else).
Lastly, all we need to do is render the HTML with Python. Let’s go to below the app = Flask(__name__) line in our Python file and add in the following code.
@app.route("/")
def index():
    return render_template("index.html")

    # Flask automatically looks in the templates folder
    # it then renders the HTML at the specified route
We also need to import render_template from flask.
from flask import Flask, render_template
We’re all done! Let’s take a look at the code below in its entirety, before taking a look at the result and drawing some conclusions!
Full Code
# app.py
from flask import Flask, render_template

app = Flask(__name__)

@app.route("/")
def index():
    return render_template("index.html")

@app.route("/hello", methods=["GET"])
def hello():
    return {"response": "Hello from Python!"}

if __name__ == "__main__":
    app.run(debug = True)
<!-- templates/index.html -->
<!DOCTYPE html>
<html lang="en">
<head>
    <meta charset="UTF-8">
    <meta name="viewport" content="width=device-width, initial-scale=1.0">
    <title>REST API Sandbox</title>
</head>
<body>
    <h1>Data from Python below!</h1>
    <p id="fromJS"></p>
    <script src="/static/pythonFetch.js"></script>
</body>
</html>
// static/pythonFetch.js
const paragraph = document.querySelector("#fromJS")

fetch("/hello")
    .then(response => response.json())
    .then(data => paragraph.textContent = data.response)
    .catch(e => console.warn(e))
Viewing the Result
Now that we’ve written the code, all that’s left to do is run it!
To do this, we need to navigate back to the root directory, holding the Python file. From there, we can use our command line to run the Flask application by typing in the name of the Python file. In my case, I named the file app.py, so I am going to write python3 app.py.
After a few seconds, the terminal should show that the Flask app is running. If you get text similar to the below, that means that your app is successfully running! Keep in mind that the exact localhost URL that it will be running on may differ.
 * Serving Flask app "app" (lazy loading)
 * Environment: production
   WARNING: This is a development server. Do not use it in a production deployment.
   Use a production WSGI server instead.
 * Debug mode: off
 * Running on http://127.0.0.1:5000/ (Press CTRL+C to quit)
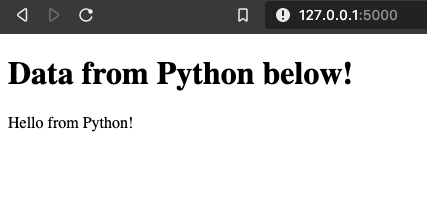
If we head over to our browser and go to localhost:5000, we should be able to see the HTML page — with the data from Python below it as a paragraph element! JavaScript has fetched this data for us from the REST API, and rendered it to the page!
If you’d like to see what the JSON looks like, you can head over to localhost:5000/hello and you’ll be able to view the JSON object the exact same way that it was put in by Python (response: "Hello from Python!").
Conclusion
In this post, we learned what a REST API is, where it is used, and then set up one of our own with Python and the Flask library, as well as some simple HTML and JavaScript. We looked at how to create different routes and fetch data from Python and the API with JavaScript — all in only about 30 lines of code!
With REST APIs, the options and avenues for exploration are truly limitless — we’ve just scratched the surface. Hopefully, you now have a basic understanding of APIs and how they work, as well as the ability to make your own. If you want to explore some more, I’d suggest checking out Flask’s documentation and look more into fetching (with POST, DELETE, etc. requests) in JavaScript here.
I’m off to continue working on my own REST API — you’ll be able to hear about it in the next post.
Until then, happy coding!
Leave a comment